AI SuperAgents: (ab)using WASM for LLM function calls - Part 1

"why are you even doing this, it doesnt make sense, half of this stuff isn't even stable, you're just torturing yourself" - Every sane person
Bleeding edge technology is fun.
You know what's also fun? Smacking two bleeding edge technologies together.
One can never know what's gonna happen - in your imagination, they will work magically in unison, bringing your vision to life with sounds of an angelic choir as it finishes compiling - in reality, you'll probably spend your nights lying in bed, thinking about the 136 tabs of github issues, half-finished documentation and unexplained source code you have open in your browser.
But if you're a novelty chasing ADHD squirrel like me and now you're remembering all those fun nights spent in these rabbit holes - oooh, do I have a treat for you. So grab your coffee, follow me into this rabbit hole and let's smash some shiny rocks together.
So, how bout those LLM's?
In the last few years, LLM's have penetrated every aspect of our world. From your Google recommendations and contents of your spam folder, to the eternal AI hypestorms on your Twitter feed, everything seems to be succumbing to the machines.
But to give machines the agency they need to interact with our world, we need to provide them with a way to do it. And how we're doing it has mostly based on the concept of LLM function calling - providing LLM's a set of possible functions to execute, together with argument descriptions. And it works just fine. We write some code, give the function description to an LLM, it returns us arguments, we call the function, say abracadabra and poof we got agency.
But what if we could make it even better?
What if we could let LLM's write their own functions? Let alone, what if those functions could be reused across conversations, constantly expanding the capabilities of our machines, providing us with a giant library of possible interactions they can have with the real world?
Oh man, wouldn't that just be great (and completely, utterly, chaotic)?
Well, what if I told you there is a perfect way to do that by using another bleeding-edge edgy technology, one that will surely raise some eyebrows at your next local meetup?
Enter WASM: the ASM of the future
If you've been paying attention to the web world the last few years, you've probably heard of WebAssembly. If not, I'll keep it quick - it's a new binary format & compile target, made so you can use your good ol' compiled languages such as C, Rust or Java in the browser instead of being constrained to just Javascript.
Basically, like your CPU runs assembly instructions, the browser has a virtual machine that runs WebAssembly instructions. Mind blowing, I know.
But unlike other tries at this (I'm looking at you, Java applets), this one actually seems properly orchestrated and executed, supported by browsers and developed in the open, standardised under W3C's supervision.
And while it was announced nearly 9 years ago, it recently started picking up quite a lot more steam, with the development of WASI and the Component model.
These allow developers to write code that communicates with the outside world (in an easier way), providing common interfaces (WASI) and allowing developers to define their own (component model). As the preview of this has been maturing lately and is quite usable now, it might just be the perfect time to start exploring all the potential the technology offers.
WASM - a language for the machines.
With the rise of the Agent and function calling paradigms, a lot of useless frameworks have popped up to provide agents with different capabilities - enabling one to chain multiple agents, provide them with function calls and feed them knowledge. Be it searching the web, writing to files or looking up wikipedia, they expand the capabilities of the machines, enabling complex, emergent behaviour to evolve.
Still, they are quite limited: they are bound to a specific language or framework, they have to be written by the developers and they are rarely shared between projects - meaning we all have to repeat the same boring API calls thousands of others developers already wrote.
But what if it didn't have to be so?
What if instead of having to write these functions ourselves, we could have the machines write them for us, on a per-need basis? What if we enabled complete automation of agents and their behaviour, providing them with whatever they need, whenever they need it, by letting them write their own code?
What if we could build a self-building machine?
With WASM, we can build just that. Let's take a look how:
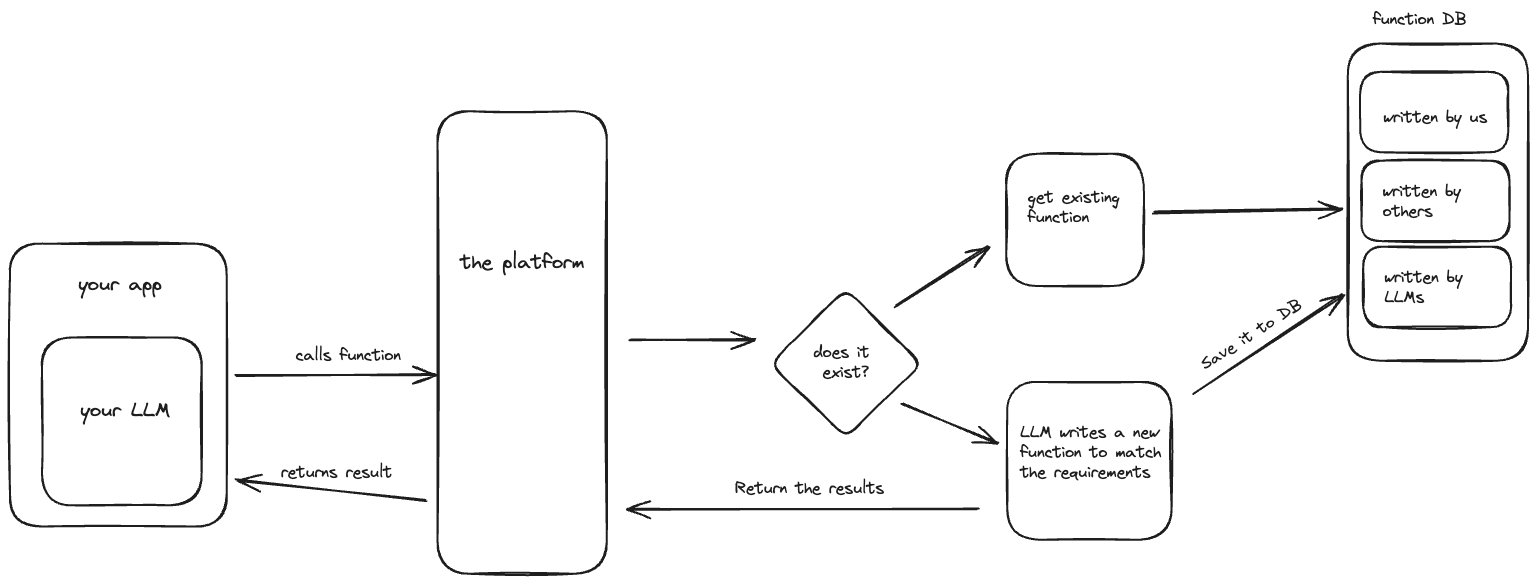
The basic idea is just like your average LLM function call - take the message, have LLM decide if it requires an external function, call the function with the provided arguments your LLM extracted from the message. But, it comes with a twist (or two):
- We can write functions in any language we want, as long as it compiles to WASM and obeys our function contract
Which enables another, way more entertaining twist:
- If the function doesn't exist, we can have another LLM agent write it, compile it, execute it and return the calls to the original agent.
Why is this so entertaining?
Because in theory, it provides us with the ultimate "self-building" machine, allowing our LLM to expand it's own capabilities as it goes - want it to scrape a website? Sure, it can write a function for that. Order an Uber? Give it an API key and watch it go. Create another LLM for you? Why not.
Note: "Technically", I should add. With the current state of LLMs, it will probably order an Uber to the middle of the Amazon and spend the budget of an average Balkan country while trying to scrape the same website 26 billion times. Still, quite entertaining.
But the best part - we get to play with shiny, new technology. And how can one say no to that?
So take out your editors, sharpen your Rust skills and let's build the self-building machine!

Building the building blocks: WASM Components
Let's start with the most important thing - building out an interface for our WASM component. We'll keep it quite simple, providing us with a few fields we need to discover and use the function. And we'll be writing it in WIT.
WIT is assembly's interface format, used to define interface for Components and Worlds. A component is just a modular piece of code obeying a contract, while a world is a contract for the "world" the component executes in, defining the interfaces the component exports (exposes to the outside world), and the interfaces that the component imports (uses from the outside world).
As a format itself, WIT is quite simple and understandable - if you've used any higher level language the syntax should be intuitive immediately. We got your god ol'bools, floats, ints, chars and the fan favorite strings. For more advanced needs, it supports not only list, tuple, option and result , but also record , variant, resource and anything else you might need. For now, we'll be doing it simply and just push JSON around, since it's the end-all-be-all internet format that LLMs can easily recognise (if you want to leave a comment like "oh no JSON, muh performance", here is your chance).
So let's define our interfaces - spin up a project folder and create a file at wit/function.wit in which we will create the basic interface .
package superagent:functions;

interface function {

}
First, we'll need to know which function to invoke and what it's arguments are, so we'll create a record called metadata that exposes us some function information. Besides name, it will also include a description so that we can search among the functions for it, and we'll list the arguments too so we know how to invoke it.
To be able to retrieve that data from a component, we'll also create a function called meta which will return our record.
package superagent:functions;

interface function {

  record metadata {
    name: string,
    description: string,
    arguments: string
  }

  // Retrieves metadata of the function
  meta: func() -> metadata;

}
Then, to call the function itself, we'll need an invoke method.
This method will take in the arguments formatted as a JSON string and return a result which can either be a JSON string containing results or an execution-error which will contain an error message.
package superagent:functions;

interface function {

  record metadata {
    name: string,
    description: string,
    arguments: string
  }

  record execution-error {
      reason: string
  }

  // Used to invoke our function
  invoke: func(input: string) -> result<string, execution-error>;

  meta: func() -> metadata;

}
And to wrap it all up together, let's define a world called host that exports our function interface:
package superagent:functions;

interface function {
   // .. all the code
}

world host {
  export function;
}
And voila, just like that our WebAssembly component is defined and ready to be implemented. To implement it, we'll be using the most annoying beloved language in the world, Rust.
First, we'll be creating a sample component that will implement the interface and that we will use to test our code. While we can do that with bindgen and wasm-tools, we'll be doing it "the right way" - by using cargo component to take out the busywork, so go ahead and do a:
cargo install cargo-component
cargo component new --lib sample
This will create a new component project in the sample directory.
Now go ahead and create a wit folder, then symlink the wit file inside (so we don't need two of them):
cd sample && mkdir wit && cd wit
ln -s ../../wit/function.wit function.wit
Now, a small diversion:
Since component model is written for WASI preview 2, and the Rust compiler only supports WASI preview 1, we need to adapt the compiled code by using an adapter - we can do this automatically with cargo component, but first we need to download wasi_snapshot_preview1.reactor.wasm adapter from the release page.
Then, we can open up Cargo.toml and add this:
[package.metadata.component]
adapter = "wasi_snapshot_preview1.reactor.wasm"
This way, code can be written to target WASI preview 2 but it's adapted so it can be used in places that support WASI preview 1 only, giving us backwards compatibility with a lot of real-world WASI implementations.
Now that we got the basics set-up, we can run cargo component build inside our sample folder and we'll see it generate a bindings.rs file with all the WIT records and interfaces code created for us. Only thing left to do is implement it, and for this sample, we'll implement a simple one called web_pinger which will do a mock check if an endpoint is running:
#[allow(warnings)]
mod bindings;

// Generated contracts
use bindings::{
    exports::superagent::functions::function,
    exports::superagent::functions::function::Guest,
};

//Generated records
use crate::bindings::exports::superagent::functions::function::{ExecutionError, Metadata};

//Create the component which will implement our WIT interfaces
struct Component;

//Implement the "guest" code, aka your webassembly component

impl Guest for Component {
    //Mock function invocation
    fn invoke(input: String) -> Result<String, ExecutionError> {
        return Result::Ok("{ up: true}".to_string())
    }

    //Get function description
    fn description() -> Metadata {
        Metadata {
            name: "web_pinger".to_string(),
            description: "Checks if a website is up by pinging it"
                          .to_string(),
            arguments: "{ \"endpoint\": String }".to_string(),
        }
    }
}
Now, if we run cargo component build, our component should be built successfuly, and we'll end up with a WASM module file at ./target/wasm32-wasi/debug/sample.wasm.
Congratulations, your first WASM component has been built 🎉
Assembling the Rube Goldberg-von Neumann machine
Now that we have set up the guest code, it's time for the host code. Go through your favorite ritual of setting up a Cargo project in your project folder and let's add some basics - first off, you'll need your WASM runtime of choice.
Now choosing one is a daunting task in itself - I'd recommend wasmtime by Bytecode Alliance and it's what I'll be using here, so let's add that to our cargo file, together with WASI support.
[dependencies]
wasmtime = { version = "18.0.1", features = ["component-model"] }
wasmtime-wasi = { version = "18.0.1", default-features = true }
Next, we'll also add two more libraries - the wit-component library for handling Components and a wit-bindgen-rust that will take our WIT interface and generate the glue code in the background.
wit-component = "0.201.0"
wit-bindgen-rust = "0.20.0"
For now, we'll leave the LLM part first and focus on WASM, since the LLM part is quite simple - create an Agent contract, implement it for your model/provider of choice, prompt tune a bit. But don't worry - we'll get to that later.
Let's figure out the bare minimum to run a WASM component:
- Take a compiled
wasmbinary - Instantiate a
Componentout of it - Start a WASM engine
- Run the component inside the engine with provided arguments
- Return the result
So open up your main.rs and start writing. First, we'll be lazy and just create a lazy static instance of a WASM engine, then define our necessary functions:
lazy_static::lazy_static! {
    static ref ENGINE: Engine = {
        let mut config = Config::new();

        // For easier debugging
        config.wasm_backtrace_details(WasmBacktraceDetails::Enable);

        // Enables component model
        config.wasm_component_model(true);

        let engine = Engine::new(&config).unwrap();
        engine
    };
}

fn run_function(arguments: String,
                component_binary: Vec[u8]) -> String {
    let component = build_wasm_component(component_binary);
    let mut instance = create_instance(component);
    let res = execute_function("invoke", "arguments", instance)
}
To build a WASM component from binary, we'll load the .wasm file into a byte array, adapt it to preview2, then use Component::from_binary to create it. Don't worry, it's quite simple and the wit-component crate is here to support it - you just need to download the adapter files and load them in, so let's do that:
//Include the WASI Preview 1 Adapter
const ADAPTER: &[u8] = include_bytes!(concat!(
    env!("CARGO_MANIFEST_DIR"),
    "/wasm-sample/wasi_snapshot_preview1.reactor.wasm"
));


fn adapt_wasm_output(wasm_bytes: &[u8],
                    adapter_bytes: &[u8]) -> Result<Vec<u8>, Error> {
    let component = ComponentEncoder::default()
        .module(&wasm_bytes)
        .expect("Cannot encode module")
        .validate(true)
        .adapter("wasi_snapshot_preview1", &adapter_bytes)
        .expect("Cannot encode adapter")
        .encode()
        .expect("Cannot encode components");

    Ok(component.to_vec())
}
To actually be able to use the classes defined in your WIT file from the host code,
we need to use a bindgen macro to generate them from WIT file. This will help us generate glue code that binds our WASM functions with our Rust ones using the defined contract. So add this to the beginning of your file and point it at the wit:
bindgen!({
    path : "wit/function.wit",
    world: "host",
});
Now, we can create our component using wasmtime , so let's implement that build_wasm_component method:
fn build_wasm_component(bytes: &[u8]) -> Component {
 let component = adapt_wasm_output(bytes, ADAPTER).unwrap();

 Component::from_binary(&ENGINE, &component)
     .expect("Cannot create component")
}
After creating a component, we're ready to move on to the next step - creating an actual instance of it. To create an instance, we need a place for it to actually live, something where it can store it's variables, functions, memory et al. That something is called a Store. So let's create a Store and a WasmState which we will store inside. To create a WasmState , let's open wasm_state.rs .
Inside, we'll create a basic struct containing two things:
WasiCtxto provide a basic WASI implementation- a
ResourceTableto access resources by reference
extern crate wasmtime;

use wasmtime::component::{ResourceTable};
use wasmtime_wasi::preview2::{WasiCtx, WasiCtxBuilder, WasiView};

pub(crate) struct WasmState {
    ctx: WasiCtx,
    table: ResourceTable,
}

impl WasmState {
    pub(crate) fn new() -> Self {
        let ctx = WasiCtxBuilder::new().build();
        let table = ResourceTable::new();
        Self { ctx, table }
    }
}
To access the table and the context, we'll also need to implement the WasiView trait:
impl WasiView for WasmState {
    fn table(&mut self) -> &mut ResourceTable {
        &mut self.table
    }

    fn ctx(&mut self) -> &mut WasiCtx {
        &mut self.ctx
    }
}
Phew, that was a lot of stuff - but finally we're ready to create the component, so let's go into the create_instance function. We'll first create a Linker, which links together host functions and instances. Then we'll link our WasmState into it and create the instance by passing in the Store it will be using and the Component we are instantiating to the linker, which should bind it all together and give us the living instance of ourComponent.
fn create_instance(store: &mut Store<WasmState>,
                  component: Component) -> Instance {
    let mut linker = Linker::new(&ENGINE);
    preview2::command::sync::add_to_linker::<WasmState>(&mut linker)
        .expect("Cannot add to linker");
    linker.instantiate(store, &component)
        .expect("Cannot instantiate component")
}
Having the instance of our WASM program, only thing left to do is run the function itself, so let's create that execute_function method. To do that, we need to get the exported interface from our component instance and find the function we need. Then, we can invoke it with the provided arguments and receive a classic Rust Result.
fn execute_function(mut store: Store<WasmState>, instance: &mut Instance,
                    name: &str, args: &str) -> Result<String, ExecutionError> {

    let mut exports = instance.exports(&mut store);
    let mut interface = exports
        .instance("superagent:functions/function")
        .expect("Cannot find interface");

    //Get the function by name
    let func = interface
        .typed_func::<(String,),(Result<String, ExecutionError>,)>(name)
        .expect("Cannot find action");
    drop(exports);

    //Call the function
    let res = func.call(&mut store, (args.to_string(), ))
        .expect("Function execution failed").0;

    //Remove the return from WASM memory
    func.post_return(&mut store)
        .expect("Cannot post return to store");
    res
}
And that's it - our WASM runner is ready. To test it, we can use the module we've build before - add it/symlink it to your project root and load it in:
fn main() -> Result<(), Error> {
    let component = build_wasm_component(GUEST_RS_WASM_MODULE);
    let mut store = Store::new(
        &ENGINE,
        WasmState::new(),
    );
    let mut instance = create_instance(&mut store, component);
    let res = execute_function(store, &mut instance, "invoke",
    "{\"endpoint\":\"google.com\"}");
    match res {
        Ok(result) => {
            println!("Result: {}", result);
            Ok(())
        }
        Err(e) => {
            panic!("{}", e.reason)
        }
    }
}
Now, if you hit Cargo run, you should see the result being outputed:Result: { up: true}
Congratulations - you have created your first WASM function and runner!
Now that the baseline is done, we can continue with the juicy bit - making the AI build it's own functions - but let's leave that for the next part of this blog post, it's getting too long and my coffee is getting too cold.
(Note: This post has been sitting in my shelf for the last few months, so some stuff might be out of date - don't worry, the declared versions here still work and the standards are still the same)